Unused files
Jump to navigation
Jump to search
The following files exist but are not embedded in any page. Please note that other web sites may link to a file with a direct URL, and so may still be listed here despite being in active use.
Showing below up to 100 results in range #51 to #150.
View (previous 100 | next 100) (20 | 50 | 100 | 250 | 500)
 400px-Crossed wheeled bin with bar.jpg 400 × 552; 18 KB
 434px-Crossed wheeled bin with bar.jpg 434 × 599; 20 KB
 435px-Crossed wheeled bin with bar.jpg 435 × 600; 20 KB
 450px-Crossed wheeled bin with bar.jpg 450 × 621; 21 KB
 600px-Crossed wheeled bin with bar.jpg 600 × 828; 33 KB
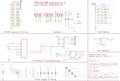
 776px-Lo-tech-1MB-RAM-Board-schematic-r02.png 776 × 600; 119 KB
 87px-Crossed wheeled bin with bar.jpg 87 × 120; 3 KB
 120px-Xilinx-parallel-cable-iii.jpg 120 × 79; 5 KB
 150px-Crossed wheeled bin with bar.jpg 150 × 207; 5 KB
 180px-Xilinx-parallel-cable-iii.jpg 180 × 119; 7 KB
 270px-Xilinx-parallel-cable-iii.jpg 270 × 178; 10 KB
 300px-Lo-tech-xt-cfv3.JPG 300 × 200; 8 KB
 320px-Lo-tech-xt-cfv3.JPG 320 × 213; 9 KB
 360px-Xilinx-parallel-cable-iii.jpg 360 × 237; 14 KB
 450px-Lo-tech-xt-cfv3.JPG 450 × 300; 16 KB
 600px-Lo-tech-xt-cfv3.JPG 600 × 400; 26 KB
 640px-Lo-tech-xt-cfv3.JPG 640 × 426; 29 KB
 120px-Lo-tech-xt-cfv2-prototype.JPG 120 × 91; 3 KB
 120px-Lo-tech-xt-cfv3.JPG 120 × 80; 2 KB
 180px-Lo-tech-xt-cfv3.JPG 180 × 120; 4 KB
 300px-Lo-tech-xt-cfv2-prototype.JPG 300 × 228; 12 KB
 316px-Lo-tech-xt-cfv2-prototype.JPG 316 × 240; 13 KB
 450px-Lo-tech-xt-cfv2-prototype.JPG 450 × 341; 23 KB
 600px-Lo-tech-xt-cfv2-prototype.JPG 600 × 455; 38 KB
 633px-Lo-tech-xt-cfv2-prototype.JPG 633 × 480; 42 KB
 790px-Lo-tech-xt-cfv2-prototype.JPG 790 × 599; 61 KB
 791px-Lo-tech-xt-cfv2-prototype.JPG 791 × 600; 61 KB
 800px-Lo-tech-xt-cfv3.JPG 800 × 533; 42 KB
 120px-Lo-tech-ISA-USB-adapter-schematic.png 120 × 78; 10 KB
 120px-Yamaha-C1-IDE-Assembled-Front.jpg 120 × 84; 6 KB
 180px-Lo-tech-ISA-USB-adapter-schematic.png 180 × 117; 19 KB
 180px-Lo-tech-xt-cfv2-prototype.JPG 180 × 137; 5 KB
 200px-Lo-tech-ISA-USB-adapter-schematic.png 200 × 130; 21 KB
 300px-Yamaha-C1-IDE-Assembled-Front.jpg 300 × 210; 20 KB
 450px-Yamaha-C1-IDE-Assembled-Front.jpg 450 × 315; 39 KB
 600px-Yamaha-C1-IDE-Assembled-Front.jpg 600 × 420; 60 KB
 800px-Lo-tech-ISA-USB-adapter-schematic.png 800 × 518; 175 KB
 800px-Yamaha-C1-IDE-Assembled-Front.jpg 800 × 560; 92 KB
 120px-Lo-tech-8-bit-ide-adapter-rev3-front.jpg 120 × 95; 4 KB
 180px-1MB-RAM-Board-r02-Top.png 180 × 148; 31 KB
 180px-Lo-tech-8-bit-ide-adapter-rev3-front.jpg 180 × 143; 10 KB
 183px-1MB-RAM-Board-r02-Top.png 183 × 150; 31 KB
 189px-Lo-tech-8-bit-ide-adapter-rev3-front.jpg 189 × 150; 10 KB
 200px-Yamaha-C1-IDE-Assembled-Front.jpg 200 × 140; 11 KB
 300px-Lo-tech-8-bit-ide-adapter-rev3-front.jpg 300 × 239; 25 KB
 450px-Lo-tech-8-bit-ide-adapter-rev3-front.jpg 450 × 358; 57 KB
 600px-Lo-tech-8-bit-ide-adapter-rev3-front.jpg 600 × 477; 101 KB
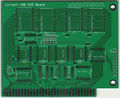
 730px-1MB-RAM-Board-r02-Top.png 730 × 600; 215 KB
 754px-Lo-tech-8-bit-ide-adapter-rev3-front.jpg 754 × 600; 161 KB
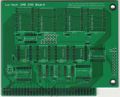
 120px-1MB-RAM-Board-r02-Top.png 120 × 99; 16 KB
 120px-Lo-tech-trs-80-ide-adapter-rev2-schematic.png 120 × 81; 12 KB
 120px-Yamaha-C1-HDD-PCB-r01.png 120 × 80; 9 KB
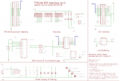 180px-Lo-tech-trs-80-ide-adapter-rev2-schematic.png 180 × 121; 20 KB
 180px-Yamaha-C1-HDD-PCB-r01.png 180 × 120; 17 KB
 200px-Lo-tech-trs-80-ide-adapter-rev2-schematic.png 200 × 134; 25 KB
 300px-Yamaha-C1-HDD-PCB-r01.png 300 × 200; 32 KB
 450px-Yamaha-C1-HDD-PCB-r01.png 450 × 300; 63 KB
 600px-Yamaha-C1-HDD-PCB-r01.png 600 × 400; 78 KB
 800px-Lo-tech-trs-80-ide-adapter-rev2-schematic.png 800 × 537; 198 KB
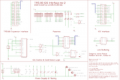
 120px-Lo-tech-8-bit-ide-adapter-rev2-schematic.png 120 × 93; 11 KB
 180px-Jride-isa-adapter.JPG 180 × 135; 6 KB
 180px-Lo-tech-8-bit-ide-adapter-rev2-schematic.png 180 × 139; 20 KB
 194px-Lo-tech-8-bit-ide-adapter-rev2-schematic.png 194 × 150; 22 KB
 200px-Yamaha-C1-HDD-PCB-r01.png 200 × 133; 22 KB
 640px-Jride-isa-adapter.JPG 640 × 480; 48 KB
 775px-Lo-tech-8-bit-ide-adapter-rev2-schematic.png 775 × 599; 176 KB
 776px-Lo-tech-8-bit-ide-adapter-rev2-schematic.png 776 × 600; 179 KB
 800px-Jride-isa-adapter.JPG 800 × 600; 69 KB
 800px-Yamaha-C1-HDD-PCB-r01.png 800 × 533; 142 KB
 120px-Jride-isa-adapter.JPG 120 × 90; 3 KB
 120px-Lo-tech-ISA-USB-Adapter-PCB-Front.JPG 120 × 60; 3 KB
 180px-Lo-tech-ISA-USB-Adapter-PCB-Front.JPG 180 × 89; 6 KB
 185px-Lo-tech-2MB-EMS-board-pcb.JPG 185 × 150; 9 KB
 200px-Lo-tech-ISA-USB-Adapter-PCB-Front.JPG 200 × 99; 7 KB
 300px-Lo-tech-ISA-USB-Adapter-PCB-Front.JPG 300 × 149; 16 KB
 320px-Jride-isa-adapter.JPG 320 × 240; 16 KB
 450px-Lo-tech-ISA-USB-Adapter-PCB-Front.JPG 450 × 224; 32 KB
 600px-Lo-tech-ISA-USB-Adapter-PCB-Front.JPG 600 × 298; 56 KB
 800px-Lo-tech-ISA-USB-Adapter-PCB-Front.JPG 800 × 398; 90 KB
 120px-Lo-tech-2MB-EMS-board-pcb.JPG 120 × 98; 4 KB
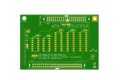
 120px-Xt-cfv3-pcb.png 120 × 112; 16 KB
 180px-Lo-tech-2MB-EMS-board-pcb.JPG 180 × 146; 9 KB
 180px-Xt-cfv3-pcb.png 180 × 168; 31 KB
 258px-Xt-cfv3-pcb.png 258 × 240; 57 KB
 300px-Xt-cfv3-pcb.png 300 × 279; 72 KB
 450px-Xt-cfv3-pcb.png 450 × 419; 142 KB
 515px-Xt-cfv3-pcb.png 515 × 480; 179 KB
 600px-Xt-cfv3-pcb.png 600 × 559; 222 KB
 644px-Xt-cfv3-pcb.png 644 × 600; 257 KB
 738px-Lo-tech-2MB-EMS-board-pcb.JPG 738 × 600; 132 KB
 120px-Lo-tech-ISA-Slot-Bracket-Type-2.jpg 120 × 113; 3 KB
 120px-Qumetrak-142-floppy-drive-underside.jpg 120 × 80; 3 KB
 159px-Lo-tech-ISA-Slot-Bracket-Type-2.jpg 159 × 150; 5 KB
 200px-Qumetrak-142-floppy-drive-underside.jpg 200 × 133; 7 KB
 300px-Lo-tech-gpio-interface-board-mounted-on-RaspberryPi-Bplus.JPG 300 × 211; 10 KB
 300px-Qumetrak-142-floppy-drive-underside.jpg 300 × 200; 14 KB
 400px-Qumetrak-142-floppy-drive-underside.jpg 400 × 267; 22 KB
 600px-Lo-tech-gpio-interface-board-mounted-on-RaspberryPi-Bplus.JPG 600 × 421; 30 KB
 635px-Lo-tech-ISA-Slot-Bracket-Type-2.jpg 635 × 599; 63 KB
 636px-Lo-tech-ISA-Slot-Bracket-Type-2.jpg 636 × 600; 63 KB


