Difference between revisions of "Lo-tech XT-CF CPLD Programming Guide"
Lo-tech>James |
m (1 revision imported) |
(No difference)
| |
Latest revision as of 11:11, 21 April 2021
There are several ways to program the Xilinx XC9572XL CPLD chip used on the lo-tech XT-CF Board and the lo-tech XT-CFv2 Board.
JTAG Interface
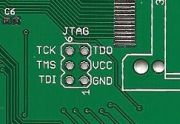
The boards include a 6-pin header that provides access to the JTAG pins on the CPLD needed for programming and provides a means of powering the CPLD whilst outside a PC.
| Connection | Pin | Pin | Connection |
|---|---|---|---|
| TCK | 6 | 5 | TDO |
| TMS | 4 | 3 | VCC (5V) |
| TDI | 2 | 1 | GND |
XT-CF and XT-CFv2 JTAG header pinout
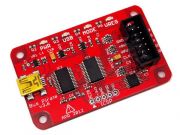
Dangerous Prototypes Bus Pirate
The Dangerous Prototypes Bus Pirate (with the XSVF player firmware) can be used and requires just the XSVF file and a USB port.
When using the BusPirate, connection colours will depend on the cable type in use.
- Seeed Studio Bus Pirate ProbeKit (onSOIC version):
- GND: Black
- VCC: Grey (5V)
- TDO: Brown
- TCK: Yellow
- TMS: Red
- TDI: Orange
Method
- Load the Bus Pirate with the XSVF player firmware (one-time operation)
- Remove the XT-CF or XT-CFv2 card from the PC and remove any media (compact flash or microdrive)
- Connect the cables accordingly to the XT-CF or XT-CFv2 board
- Connect the Bus Pirate to the PC. The Bus Pirate will appear to the PC as a serial (COM) port, for example it may appear as COM7. The device name can be confirmed from the Windows Device Manager
- Using a command window, use the bpxsvfplayer utility to load the XSVF file into the CPLD
For example:
C:\xtide>bpxsvfplayer -p com7 -f xt-cfv2-8b-r01.xsvf
-----------------------------------------------------------------------------

 BusPirate XSVF Player V.01
 http://www.dangerousprototypes.com

-----------------------------------------------------------------------------
File is 53289 bytes, read 53289 bytes Opening Bus Pirate on com7 at 115200bps, u
sing XSVF file xt-cfv2-8b-r01.xsvf
 Entering XSVF Player Mode
 Waiting for first data request...ok
Sending 4096 Bytes (1000)...ok
Sending 4096 Bytes (2000)...ok
Sending 4096 Bytes (3000)...ok
Sending 4096 Bytes (4000)...ok
Sending 4096 Bytes (5000)...ok
Sending 4096 Bytes (6000)...ok
Sending 4096 Bytes (7000)...ok
Sending 4096 Bytes (8000)...ok
Sending 4096 Bytes (9000)...ok
Sending 4096 Bytes (A000)...ok
Sending 4096 Bytes (B000)...ok
Sending 4096 Bytes (C000)...ok
Sending 4096 Bytes (D000)...ok
Sending 41 Bytes (D029)...ok
End of operation reply 00
  Success!
 Thank you for Playing! :-)


C:\xtide>
Then disconnect the Bus Pirate from the PC, and finally remove the Bus Pirate connections from the XT-CF or XT-CFv2 board.
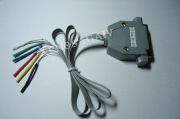
Xilinx Parallel Cable III
The Xilinx Parallel Cable III (cheap clones of which are available on eBay, such as item 110804822547) can be used directly with the Xilinx iMPACT tool (a free download). Consult the documentation with the cable for the exact pinout, however the typical colours are:
- VCC: Red
- GND: Black
- TCK: Yellow
- TDO: Purple/Blue
- TDI: White
- TMS: Green
To use the parallel cable, a PC with a parallel port is required and the .JED file (produced by Xilinx ISE).
Method
- Download and install Xilinx iMPACT
- Connect the cable to the XT-CF or XT-CFv2 card according to the cable pinout
- Connect the cable to the PC
- Start the Xilinx iMPACT program
- Select New Project
- Select the TOP.JED file required
- Select 'Program'
Then close iMPACT, disconnect the parallel cable from the PC, and finally remove the connections from the XT-CF or XT-CFv2 board.


